Friday, April 29, 2011

post blast, pre paint

Dom's bike back from the local sandblaster. I'll have to keep it somewhere warm and dry until it hits the painters: freshly blasted steel rusts like a mofo.


the whole frame...


head tube...


top tube...


lower head lug and fork crown...


brake bridge...


bottom bracket and bridge....

Hopefully the next shot has it with some paint on it.

Sunday, April 24, 2011

And now for something completely different...

Making some stainless ring-bolts for rock-climbing applications.


30 odd lengths of 316 stainless, cut to length and then a section of texture added with the angle grinder....


... and half a dozen deep notches added to the end of the shaft to provide maximum adhesion for the glue without compromising the strength of the rest of the bolt.


The bender, in all its junkyard glory. The square table thingy pivots on some big bearings, and the thick bit of steel rod in the middle is the former around which the rings bend.


The finished product. All of the bending is done cold, and there is quite a bit of spring in the steel, which means it is impossible to close the ring up completely, so once all the bending...


...is done and all of the rings are ready for welding...


...they go into the next step, which is a little hydraulic press made from an old car jack I found at the rubbish dump. The ring goes into a little slot and then after a few pumps on the jack handle, the ring closes up enough to weld.


Tack weld done in the hydraulic press holds the ring shut until I can do the full pass...


with the TIG welder and some 316 filler rod. There is one final step - to pickle the rings in an acid solution to remove the oxide scale and restore their corrosion resistance. It's hideously toxic though and I'll wait until I've finished the whole process before I do it. But that's the process in a nutshell.

Thursday, April 14, 2011

And last of all, the chainstay brace.

All mitered up, and snug against the squared off points of the bottom bracket lug.


And from another angle...


This chainstay brace was brought to you by Coopers Stout. You can see the frame - toasty flux and all - cooling in the vice.


From now on, the work is largely cosmetic - cleaning up around the bottom bracket, tapping the threads in the BB and generally cleaning up around the edges - aka shorelines - of the lugs. But basically, you could whack some wheels and a groupset on this thing and ride it now.

Friday, April 8, 2011

Adding the final touches...

First the braze-on stop for the rear derailleur cable. Obviously it's running on the underside of the drive-side chainstay. First I cleaned up the chainstay with some fine sandpaper to get it nice and clean...


...then fluxed it up and put a tiny blob of silver filler onto the tube...


...then put the clean, fluxed stop on top of the silver, weighted it down with my 'brazing finger' and gently sweated it with the torch until the whole thing came up to temperature and the silver flowed neatly around the cable stop.


Hard to see with the flux still in place, but it's got a neat radiused fillet of silver around it, blending with the tube nicely.


Next, the rear brake bridge. I'm sure there are simple and fast ways of doing this, but I didn't want to take the risk of buggering it up as (a) it's my last brake bridge of this type and (b) the closer I get to finishing this frame the less I want to mess anything up. So I scribed some lines on the bridge - same distance from the edge on each side - and used the lines to ensure that I kept both sides of the bridge even as I was trimming it to length. I would file it down with a round file and then smooth out the filed scallop with a grinding stone I'd dressed to be the same diameter as the seat stay.
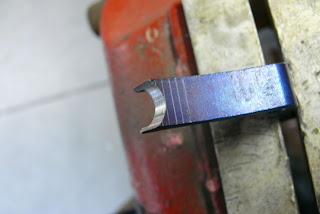


Because of the curved nature of the bridge, I had to have some way of knowing when the brake hole was at the correct height, so I ran a piece of tape across it to give me a reference.


And after a lot of patient filing and grinding, this was the result: a very neat tight fit with no gaps. Should braze up very nicely indeed.


And below, the finished bridge, ready to go in. I'll braze this in tonight, which just leaves the chainstay bridge till it's all finished.


Edit:

The next day, post clean-up...


And the brake bridge. As I was doing all of the mitering to get this to fit I was cursing the design of the bridge and it's v-shaped profile. Compared to a straight bridge it's a pain in the arse to fit. But all faults were forgiven once I soaked the flux off. All of the effort in getting a tight miter paid off and it looks fantastic. Will definitely use these again.

Sunday, April 3, 2011

Just a quick update. Stole some time this afternoon to work on cleaning up the seatstay to rear dropout join. I said some while back that you do these by adding an excess of brass and then carefully filing and shaping it back to a smooth joint. I do the front and back of the join first, filing the brass an steel tab of the dropout down to a nice smooth transition, and then I hit the sides of the join with a sanding drum to get a concave face at the bottom of the stay.


It's a ridiculous amount of work for such a tiny joint. I'm sure with better brazing and heat control I could get the work required down a bit but for the moment it's a real time soak.


A while ago I posted a pic of a frame I made for myself last winter. It's been off to the blaster's to get sandblasted and I'm just giving it the once-over before getting it painted. I used a wishbone read stay on this one. You can see where the seatstays join into the Y-shaped yoke and where the single tube continues up to the back of the seat cluster. Looks cool, but I'm not in a hurry to do another one.

Thursday, March 31, 2011

There has been a bit of a hiatus in DB's frame. Some depressing health stuff in the family, a very heavy work schedule and a few other things have kept me out of the shed. And all the while, I've been niggled by the fact that the right chainstay attached about 1.5mm lower than the left seat-stay. No-one other than myself would have noticed it, but it bugged me. So I decided I would fix it.


Off with the stay, clean it up, reposition it and have another crack. You can see just how much surface corrosion you get in a couple of weeks. The right one is lovely and clean, but that rust bloom just keeps coming back to freshly cleaned steel.


Not that you can tell once you've coated it al in flux and hit it with the torch. All fixed now, and I can stop being bothered by it.


The finished seat cluster. The end caps look nice against the seat lug - very crisp. I've been looking forward to this next bit for ages - trimming the excess off the seat tube and getting the top of the lug all tidied up...


... and after some work with the half-round file and then cutting the slot with the warding file, it's close to done. I think it might need a touch more work just to clean up the curves a little, but it's almost there.


Final task for the night - reaming the seat tube. It'll take a 27.2mm seat post and the reamer had very little work to do this time around. A tiny bit of resistance in the first 50mm or so, probably due to a bit of heat distortion, but it really didn't need much work at all. OK. enough for now. Maybe some work on the dropouts tomorrow if time permits. Nice to be back on it.

Friday, March 11, 2011

The last of the distractions. This is the bike that got me started with framebuilding. The very first time I put a brazing torch to a bike was when I cut out the crash damaged rear triangle and replaced it, converting the bike to single-speed in the process. It's been reborn with a fresh lick of powdercoat as a commuter for a friend of mine...


... after I made a new fork to replace the one I mangled when I reversed into a parking garage with the bike on the roof. The fork, like the frame is new-old-stock Columbus SLX. Long Shen crown and socket style drops. The new owner, or perhaps custodian, is stoked to say the least.


Last piece in the puzzle for this bike - the rear brake bridge. Hopefully this weekend.

Thursday, March 10, 2011

Been a bit distracted by other things. I'm putting together a singlespeed for a friend of mine as well at the moment, and the wheels, amongst other things, needed a bit of attention.


But despite the distractions, the rear end of the new frame has finally come together. Trial fit below, with the mitered seatstays in place. Is there anything that an old toe-strap can't do?


See how the seatstay end caps are mitered to fit the seat lug? This is so damn neat, and the resulting surface area will make for a hella strong connection. All of that extra tube above the lug will be coming off in the next day or two.


Both stays brazed up at the seat cluster. These are brazed with silver, which wicks into tight gaps like that really well.


While at the other end, I use brass, to build up the dropout end of things. A big excess of brass has gone on, but will be shaped back to match the chainstay end of things, with a neat scalloped edge.


Jobs to come: clean up both ends of the seatstays, trim off the seat tube and clean that up, slot the seat binder, braze in the brake bridge and the chainstay bridge.

Tuesday, March 1, 2011

Crazy weather here. We're one day out of summer and it's f'ing freezing in the Central Highlands. We've been fogbound and rainy for two days and nights and it struggled to crack double digits here until the afternoon. Last winter, I spent what could have been valuable bike building time making a wood stove for the shed. I don't regret it now.


I had an unexpected day off work, so I managed to get the chainstays on. Before getting to this point, there was fair bit of tweaking the exact shape of the oval end, and grinding the sockets to fit, but the photos only show the chainstays in the bottom bracket and the whole thing fitted up in the jig.


You can never have too much flux. The stuff's not exactly cheap, but I'd rather plaster it on than deal with the horrible burned on crap that you get if you use too little. If you use plenty, and don't burn it by keeping the torch in the one spot for too long, it all scrubs off in hot water, leaving clean shiny metal underneath. I'm happy to pay $15 a jar for that.


Checking the dropout spacing post-braze. Gotta be happy with that. It'll be interesting to see how much the paint adds to the thickness, but for now things are bang on.


And after a little clean-up, the oval chainstays are in. The photos are getting crappy, as I was shooting without a flash and my main work light blew on the weekend.


Only seatstays and little details to go.


I'm building this frame using Columbus Zona tubing. Zona is sort of the mid-range tubeset that Columbus offer, but I reckon it's one of their best. They offer the top and down tubes in two different weights/thicknesses, the seat tube takes a 27.2mm post, and they do a good range of dimensions in all of the other tubes as well. The stuff is easy to work with and impressively close to specification. One of these days I'll make something using their high-end tubes like Spirit or Life, but for the moment, Zona is really hard to beat.

Sunday, February 27, 2011

Chainstays, a test wheel and mudguards are fitted up. Obviously the chainstays need to be shortened a lot, but I'm more interested to see how the mudguard interacts with the bottom bracket area. One problem that emerged was how to attach the mudguard to a chainstay bridge without losing too much clearance.


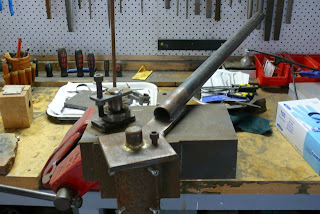
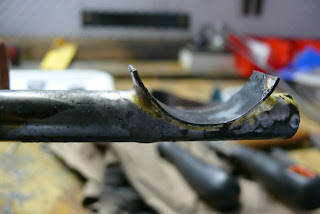
So, rather than use a pre-fab chainstay bridge, I decided to make my own. I got a length of 1/2" cro-mo tubing, and filed a big arse scallop in it. Then cut and bent a small section of head tube to the same profile as the mudguard. Some more filing and then I brazed them together with brass.


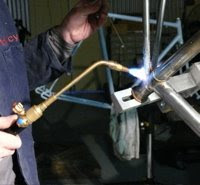
... them trimmed the excess off with a file and profiled it all down so the curve was perfectly integrated with the tube. Next, I drilled a 1/4" hole in it and brazed in a stainless water bottle boss. The bosses are extra long so it pierced the tube easily.


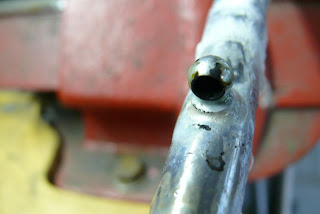
Flux scrubbed off, and the bottle boss filed down flush with the curve and the tube.


So now the bridge has a neatly integrated stainless threaded section in the middle that will cuddle up to the mudguard in such a way as to keep the rear end as tight as possible.


Next steps... Trim the chainstays to an approximate fit and make sure all of the bits fit cleanly. Then back in the jig and braze the chainstays in and add the chainstay brace. Stay tuned.