First the braze-on stop for the rear derailleur cable. Obviously it's running on the underside of the drive-side chainstay. First I cleaned up the chainstay with some fine sandpaper to get it nice and clean...

...then fluxed it up and put a tiny blob of silver filler onto the tube...

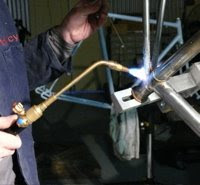
...then put the clean, fluxed stop on top of the silver, weighted it down with my 'brazing finger' and gently sweated it with the torch until the whole thing came up to temperature and the silver flowed neatly around the cable stop.

Hard to see with the flux still in place, but it's got a neat radiused fillet of silver around it, blending with the tube nicely.

Next, the rear brake bridge. I'm sure there are simple and fast ways of doing this, but I didn't want to take the risk of buggering it up as (a) it's my last brake bridge of this type and (b) the closer I get to finishing this frame the less I want to mess anything up. So I scribed some lines on the bridge - same distance from the edge on each side - and used the lines to ensure that I kept both sides of the bridge even as I was trimming it to length. I would file it down with a round file and then smooth out the filed scallop with a grinding stone I'd dressed to be the same diameter as the seat stay.

Because of the curved nature of the bridge, I had to have some way of knowing when the brake hole was at the correct height, so I ran a piece of tape across it to give me a reference.

And after a lot of patient filing and grinding, this was the result: a very neat tight fit with no gaps. Should braze up very nicely indeed.

And below, the finished bridge, ready to go in. I'll braze this in tonight, which just leaves the chainstay bridge till it's all finished.

Edit:
The next day, post clean-up...

And the brake bridge. As I was doing all of the mitering to get this to fit I was cursing the design of the bridge and it's v-shaped profile. Compared to a straight bridge it's a pain in the arse to fit. But all faults were forgiven once I soaked the flux off. All of the effort in getting a tight miter paid off and it looks fantastic. Will definitely use these again.

No comments:
Post a Comment