
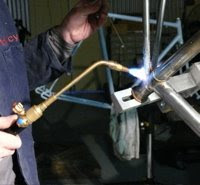
So, rather than use a pre-fab chainstay bridge, I decided to make my own. I got a length of 1/2" cro-mo tubing, and filed a big arse scallop in it. Then cut and bent a small section of head tube to the same profile as the mudguard. Some more filing and then I brazed them together with brass.

... them trimmed the excess off with a file and profiled it all down so the curve was perfectly integrated with the tube. Next, I drilled a 1/4" hole in it and brazed in a stainless water bottle boss. The bosses are extra long so it pierced the tube easily.

Flux scrubbed off, and the bottle boss filed down flush with the curve and the tube.

So now the bridge has a neatly integrated stainless threaded section in the middle that will cuddle up to the mudguard in such a way as to keep the rear end as tight as possible.

Next steps... Trim the chainstays to an approximate fit and make sure all of the bits fit cleanly. Then back in the jig and braze the chainstays in and add the chainstay brace. Stay tuned.
No comments:
Post a Comment