Sunday, February 27, 2011

Chainstays, a test wheel and mudguards are fitted up. Obviously the chainstays need to be shortened a lot, but I'm more interested to see how the mudguard interacts with the bottom bracket area. One problem that emerged was how to attach the mudguard to a chainstay bridge without losing too much clearance.


So, rather than use a pre-fab chainstay bridge, I decided to make my own. I got a length of 1/2" cro-mo tubing, and filed a big arse scallop in it. Then cut and bent a small section of head tube to the same profile as the mudguard. Some more filing and then I brazed them together with brass.


... them trimmed the excess off with a file and profiled it all down so the curve was perfectly integrated with the tube. Next, I drilled a 1/4" hole in it and brazed in a stainless water bottle boss. The bosses are extra long so it pierced the tube easily.


Flux scrubbed off, and the bottle boss filed down flush with the curve and the tube.


So now the bridge has a neatly integrated stainless threaded section in the middle that will cuddle up to the mudguard in such a way as to keep the rear end as tight as possible.


Next steps... Trim the chainstays to an approximate fit and make sure all of the bits fit cleanly. Then back in the jig and braze the chainstays in and add the chainstay brace. Stay tuned.

Monday, February 21, 2011

Not much time tonight, but I did one or two quick jobs. The pins in the head tube were filed flush inside and out, and the excess head tube above the lug was filed down, first roughly and then with a fine file.


Plenty of cutting goop, and the top end of the head tube is reamed and faced, leaving...


... the right internal diameter and a nice parallel face. I'm getting a bit of chatter on the facer, which isn't ideal. You can see the tiny ripples at 4 o'clock and 10 o'clock. Won't affect the headset alignment, but it's annoying anyway. I'll face again after paint and see if I can clean it up then.


... and the same process of grind, file, ream and face on the lower head lug, and this process is finished. Nice to get something done, even if it's not much.

Sunday, February 20, 2011

... taking up from where I left last time. The frame had been in he jig, and all the angles were set, and all tubes had been aligned and pinned in place. I then pulled it all apart and in one push (so I didn't get rust on the tubes again) I cleaned the tubes, gave the insides of the lug sockets a quick whiz with a sanding drum to get rid of any oxides, and then washed all of the tubes in hot soapy water, inside and out. A quick wipe down with some disc brake cleaner to get rid of any oily fingerprints and then the whole frame went back together with some flux.


Back in the jig and pinned up again...


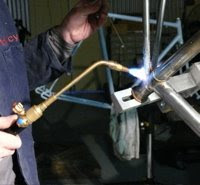
....before tacking the points of the lugs down with a little silver. Then out of the jig, check the alignment and into the repair stand for the full braze. The first couple of frames I made, I brazed them in the jig, but there is a body of thought out there on the interwebs that the frame needs to be free to expand or contract during the brazing process so as not to introduce stresses and distortions. Whatever the thinking behind it, it seems to work, as my last two frames have been spot on in alignment.


In the repair stand and ready to go. Despite an issue with my acectylene regulator while brazing, it all went really well. The off to the soak tank to soak the flux off.


Sorry son, you can't play until the flux has all gone. OK, so my soak tank is my toddler's wading pool. You make do.


Flux soaked off, and a little 240 grit later...


Looking good. Frame angles stayed spot on - 73 degree seat tube and 73.5 degree head tube. You can see an excess of silver on the head tube above the top lug. Since that extra tube will get cut off in the facing process, it's a good place to draw any excess silver during the brazing process so the leg shorelines don't end up looking gloopy.


I get to take a little break from this until next Friday, when I get the mudguards. I want to make sure that the rear end I build will work with the mudguards DB plans to use, so I won't cut the chainstays until I have all the bits. So until then, some more clean-up on the lugs, some major cleanup in the shed, and a full week of work.

Friday, February 18, 2011

Gastro, work and family commitments have kept progress slow, but the font triangle is coming together. This crazy non-summer we've been having has been playing hell with the raw tubes and lugs. You can see the bloom of surface rust spreading over them.


So, basically, the front triangle is fitted into the jig and all of the tubes have been pinned in place.


Head-tube pinned up and almost ready to go.


Seat cluster pinned up.


Yeah baby - angles are dead on.

Next steps: pull it all apart again, clean the tubes and lugs inside and out, flux them up and put it all back in the jig. The front triangle should be brazed up over the weekend. Getting there.

Saturday, February 5, 2011

Following on from the last post, the chainstays are brazed up. I've kind of cheated and only showed the finished shot, but in between they have a huge excess of brass on them which gets filed and shaped back to what you can see here.


Close-up of the concave face at the end of the chainstay. Carefully shaped with a sanding drum on the Foredom grinder.


Next step is to set up the frame jig to the desired angles. The recent crazy weather and extreme humidity has put a bloom of surface rust over the whole jig. Grr.


Bottom bracket and seat tube in place...


... and at the top.


Over the next couple of days the tubes and lugs will get loaded into the jig and all of the angles and clearances checked and checked again. Coming together...

Tuesday, February 1, 2011

lug tweaking and chainstays

Weather has been stinking hot here, and I've been flat out like a lizard drinking with work. No interest in lighting a torch and melting things, but I have been steadily chipping away at the little things.

The first job was to tweak the lugs so that they matched the desired frame angles. Fortunately, the lugs were all within 1 degree of the desired angles, so the amount of grinding, bending and general panel beating was fairly minimal. Upper head lug, lower head lug and seat lug all got the treatment, with the seat lug needing the most intervention.


With that out of the way, I could move onto the last of the sub-assemblies - the chainstays. I'm using oval Zona chainstays, which are lovely, but because they are oval and can only fit into the BB shell one way, you need to get the dropouts positioned right. So, first I sprayed the tips in layout blue and mounted them in the BB shell...


...then ran a file along the top and bottom to get a reference line to keep the dropout slot in phase with the oval section...


... then slotted the tip with a combination of hacksaw and warding file...


... trial fit with the dropouts. DB wants short horizontal drops with mudguard eyes, giving him the option to run geared or singlespeed. I'll get some mudguards off him in the next week or so so I can do a trial fit-up of the whole rear end before deciding on chainstay length.


Both chainstays fitted up, with a dummy axle between them to ensure that they are in phase with each other. I got the dummy axles a couple of years ago with some disc brake tab jigs. next to the tube blocks you see in a lot of the photos, they are about the most useful tools I use. I'd be lost without them.

next steps: Brazing up the chainstay tips and shaping the ends, and setting up the jig and fitting it with the main tubes and lugs.